How to convert dvd and video to MP4, AVI, WMV, iPhone, BlackBerry, and many other devices.
Now I will introduce you an all in one solution. Only one program will help you solve all your questions, that is Nidesoft DVD Ripper Suite. This program consists of two wonderful software: Nidesoft DVD Ripper and Nidesoft Video Converter. Nidesoft DVD Ripper is an excellent software with powerful functions that can convert DVD files to almost all popular video and audio formats including MP4, MP3, AVI,WMV, 3GP, AVC, AAC,etc. Nidesoft Video Converter can convert between almost all popular video and audio formats so that you can get movies and music from any format files. The quality is high and the speed is super fast. Also it is easy to use, only a few clicks were needed.
You can download the Nidesoft DVD Ripper suite by this link: http://nidesoft.com/downloads/dvd-ripper-
suite.exeAnd you may get more information about this program here:http://www.nidesoft.com/dvd-ripper-suite.html
 Then I will introduce you how to get movies and music from DVD, YouTube and other video files with this powerful program.
How to get movies and music from DVD?
Step 1: you may open the Nidesoft DVD Ripper and load DVD movies first.
a.Open the Nidesoft DVD Ripper Suite you have just downloaded,
click “DVD Ripper”, then you may get the software Nidesoft DVD Ripper.
b.Insert the DVD disc into the DVD Drive
c.Click the Open DVD button, browse your computer, find the DVD folder of the movie and open it.
After add your movie, you can click any title or chapter to preview it in the preview window on the right. Then you can choose any titles or chapters you want to convert by click the check boxes before them. In this way, you can choose to convert DVD with the entire movie or just convert one or several chapters. Step 2: Nidesoft DVD Ripper has powerful functions that enable you edit your video during conversion.
You may use the functions below to make your perfect video.
Merge: A regular DVD movie has several chapters, you can convert several chapters into one by click the blank box before merge into one file. Click the check box before any chapter you want and merge them into one file.
Crop: you can cut off the black edges of the DVD movie to watch in full screen by click the crop button.
A window will be opened and you can customize the size of screen by your will.
Effect: Click the Effect button you can set special effect including gray effect and negative effect. You can also set the brightness, contrast, saturation and volume.
Trim: as you have selected the clips to convert, you can trim any segment of the clips by clicking the trim button. You can move the slide below the screen or set the start time and end time to trim any segment.
Step 3: you may customize the output video with its full functions.
Audio Track: Select an audio track from the available audio tracks of your DVD movie.
Subtitle: Common DVD movies have several subtitles such as English, Chinese, French, etc. You can choose one language you prefer or select “None” to delete subtitle.
Profile: Click the button and show the list of profiles, you can select the profiles you want. For example, if you want to convert your DVD movies to your iPod video player, click the “iPod video MPEG-4 (*.mp4)”.
 Note: If you don’t know which format to convert, you may choose the profile according to your portable player. For example, if your portable player is PSP, choose the profile “PSP Video MPEG-4 (*mp4)”
Settings: If you want to customize the output video’s quality, you can click the settings button to open the settings window and set video resolution, video bitrate, audio channels, and audio bitrateDestination: Click the browse button and select a location on your computer for the output video files.
Step 4: now you can start your conversion. After the settings finished, you can just click the convert button to start the conversion. You can view the conversion speed at the bottom. The conversion will be completed in few minutes.
How to get movie and music from YouTube and other video files?
To get movie and music from YouTube, you should free download it to your PC first.
1. Open the website: http://www.techcrunch.com/get-youtube-movie/ this is a free Online YouTube Video Download Tool and you can download free video on here.
2. Go to the YouTube website: http://www.youtube.com/. Find the video you like, click “more share options”, the link will show out, copy the link from the box below “Copy and paste this link into an email or instant message” under the video. Or, you can just copy the link in the IE line.
3. Paste the link in the box on the website: http://www.techcrunch.com/get-youtube-movie/
 4. Click the button “Get Video” next to the box and download the video in flv formats in your
computer.
Note: to download the video in flv format, you should rename the file by add “.flv”.
The file downloaded from YouTube is in “flv” format, you may follow the way below to convert the flv files or other video files in your computer into your portable player.
Step 1: open the Nidesoft Video Converter and load files.
a. Open the Nidesoft DVD Ripper Suite you have just downloaded, click “Video Converter”, you may get the software Nidesoft Video Converter.
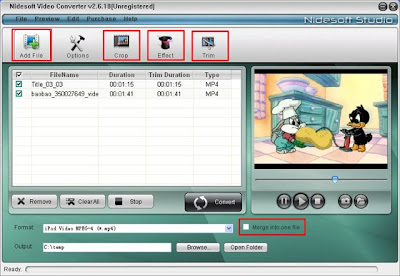
b. click "add Files" button and import the videos from your computer. Nidesoft video converter supports batch conversion so you can import multiple files at one time.
 c. EDIT the video with the function button:Crop, Effect, Trim, Options
(1) Crop: Remove the undesired area or just convert part of the video area from your video file by dragging the frame around the video or setting the crop values: Top, Button, Left and Right.(2) Effect: You can Select gray effect or Negative effect from Special Effect or tune the Brightness, Contrast, Saturation and Volume to get special effect movie.
(3) Trim: To get your favorite segment by setting the “Start Time” and “End Time” or dragging the Start Time slider to set the start time and dragging the End Time slider to set the finish time.
(4) Options:Set video Resolution, video Bitrate, Audio Channels, and Audio Bitrate to customize the output video's quality.Note: You could click the white box besides "Merge into one file" to merge your selected titles into one video before starting the conversion.
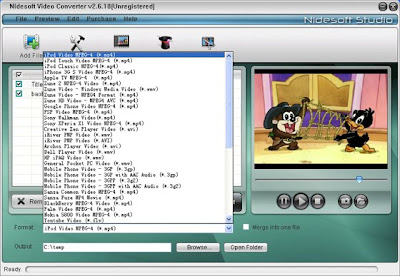
d. Select the out file formatClick the “format” drop-down list to select the output format. If you don’t know what formats your device supports, you can just select the format according to the device name.
 e. Click the "Convert" button and start the conversion. Please wait a few minutes before the conversion succeeds!
Ok, now you have got music from videos and next what you need to do is enjoying it. If you have any questions, please email to: support@nidesoft.com. It’s my pleasure to help you solve your problem.


0 comments:
Post a Comment